Generating a V1 APK signature scheme for the Clover sandbox.


The V1 APK signature scheme is a method used to sign Android apps (APKs) to ensure their authenticity and integrity. When an app is signed using V1, it’s like putting a digital seal on it. This seal is created using a special key that belongs to the app developer. The seal is unique to the app and acts as a proof that the app is genuine and has not been tampered with.
The V1 scheme signs the entire app, including its contents like images, code, and other files. This way, if someone tries to change anything in the app, the seal will break, and the device will know that the app has been modified.
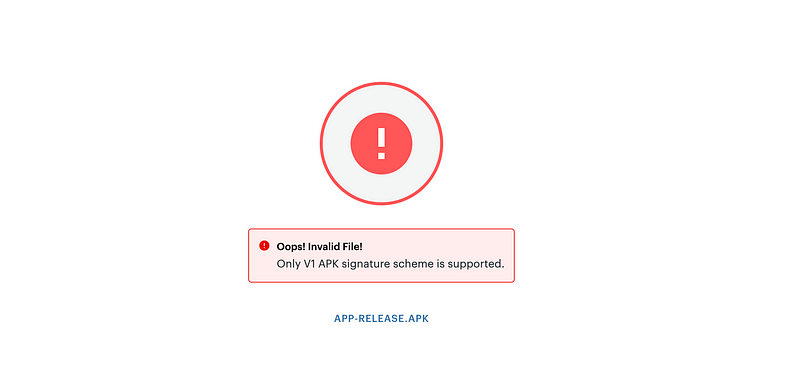
If you wish to make an app for the Clover App Market, then we need to develop it in the Clover Sandbox to test it, and for that, we need the apk to be signed with V1 signature scheme.
To do that in React Native is actually quite simple.
Let’s assume that we have set up a React-Native CLI project with the command npx react-native@latest init AwesomeProject
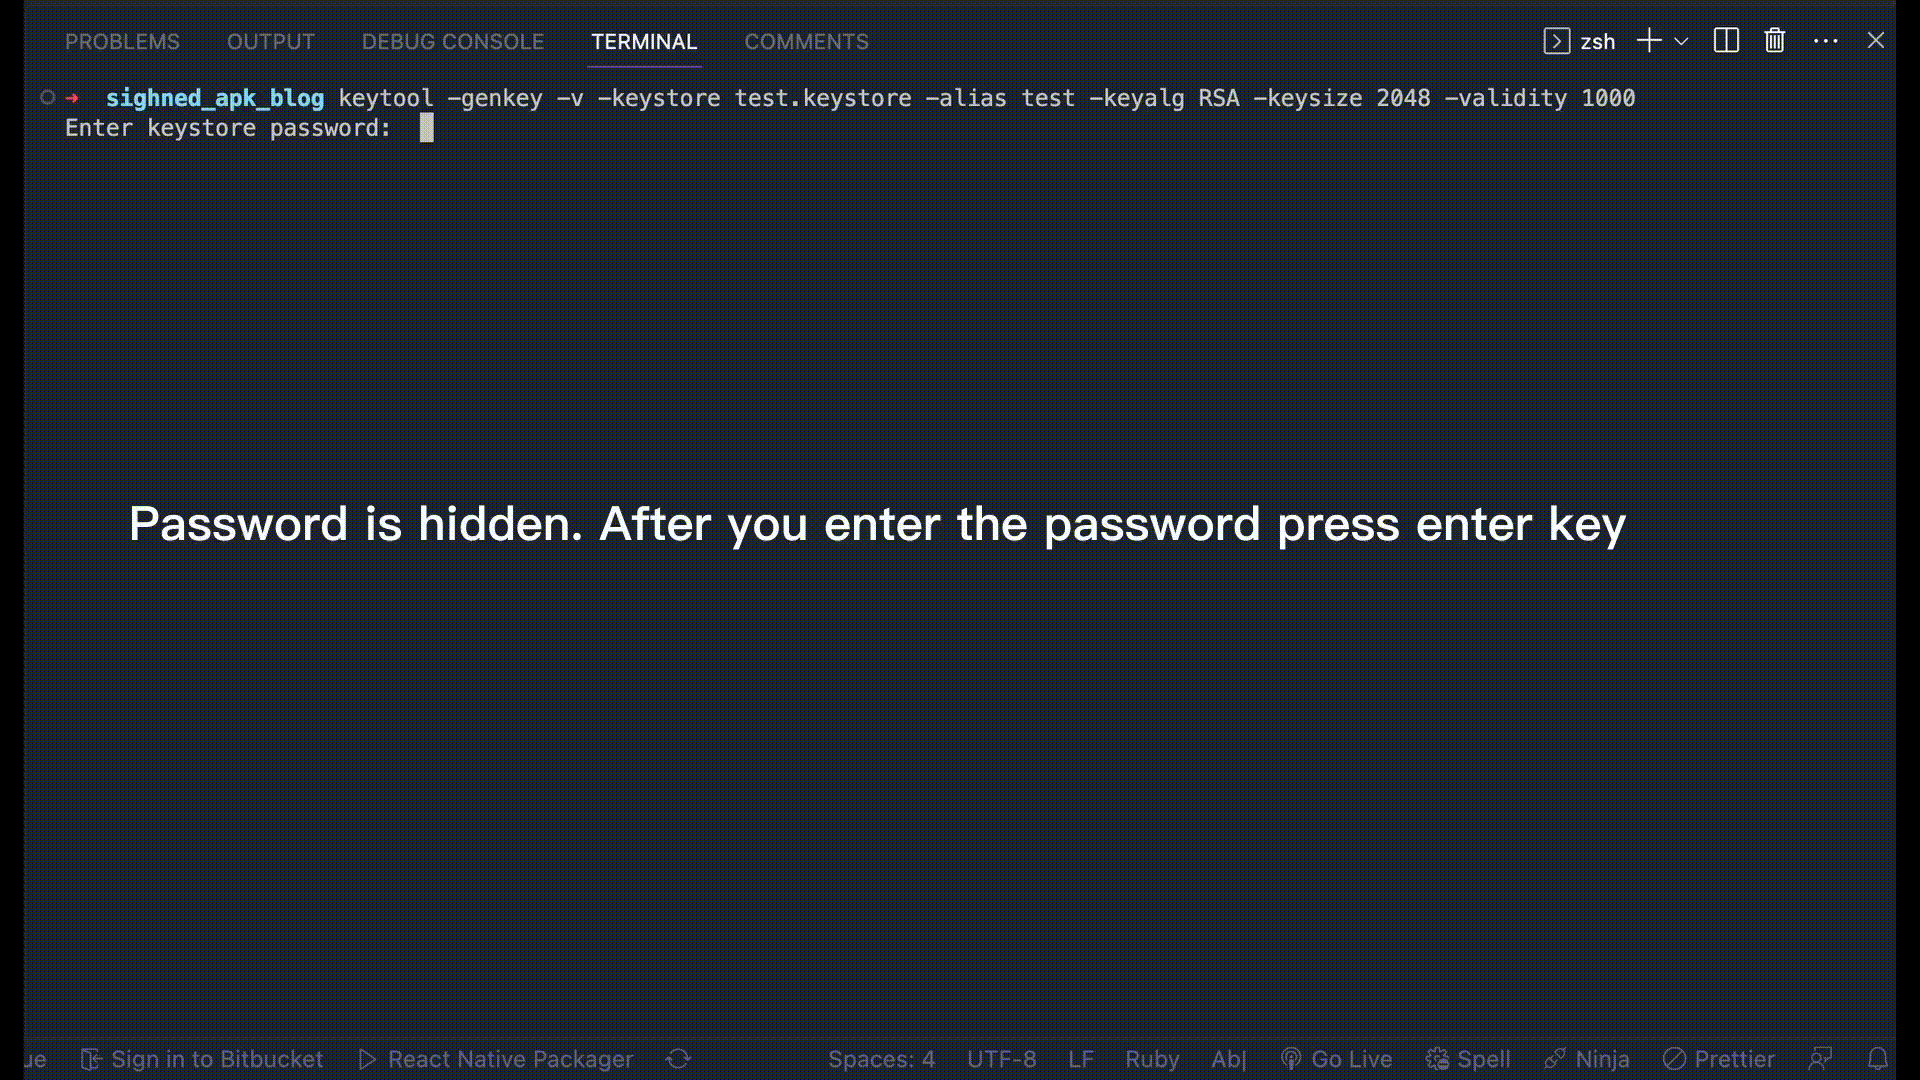
- Generate a keystore by using the command on your project root folder.
keytool -genkey -v -keystore test.keystore -alias test -keyalg RSA -keysize 2048 -validity 1000
keytool: Command-line tool for managing keystores.-genkey: Generates a new key pair.-v: Provides detailed output during the generation process.-keystore test.keystore: Specifies the name and location of the keystore file. You can change the name of the .keystore file to whatever you wish.-alias: When you generate a keystore file using thekeytoolcommand, you have the option to create multiple key entries within the keystore. Each key entry represents a different cryptographic key pair, which includes a private key and its corresponding public key. Thealiasis used to identify and reference a particular key entry within the keystore. It provides a way to distinguish between different keys if you have multiple key entries within the same keystore file.-keyalg RSA: Uses the RSA algorithm for key generation.-keysize 2048: Sets the key size to 2048 bits.-validity: Specifies a validity period for the key pair The validity period specifies how long the key pair is considered valid before it expires.
After you enter the command, fill the necessary details.
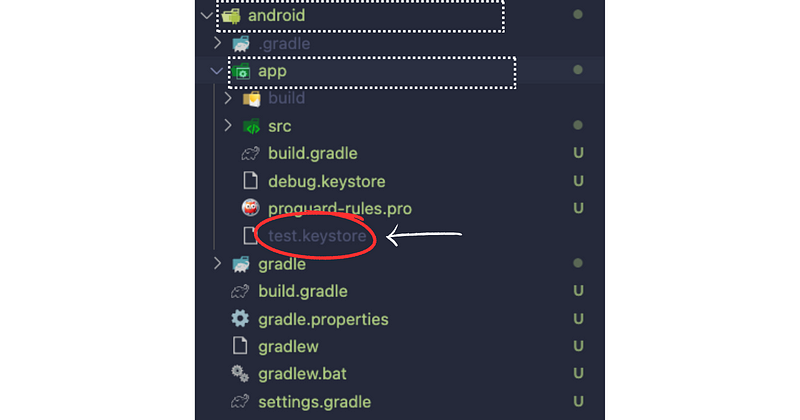
A keystore file is generated. You then have to place the newly generated keystore file in the android/app folder.
2. Go into android/app/build.gradle (not andoid/build.gradle) and replace the signingConfigs with the following code
 signingConfigs {
        release {
            v1SigningEnabled true
            v2SigningEnabled false
            storeFile file('path to the keystore file')
            storePassword 'password'
            keyAlias 'name of the alias.Check the command used for generating keystore file above'
            keyPassword 'passoword'
        }
    }
signingConfigs: This is a configuration block where you define different signing configurations for different build types.release: This is the name given to the specific signing configuration for the release build type.
Within the release signing configuration, the following properties are set:
v1SigningEnabled true: This enables the use of the older v1 signing mechanism for the release build. This mechanism is required for compatibility with older Android devices. Clover requires V1 signed apk’s and thats why we are doing it by enabling it true.v2SigningEnabled false: This disables the use of the newer v2 signing mechanism for the release build. The v2 signing mechanism provides additional security features but is not supported on Clover.storeFile: specifies the path — In our case it would be —./test.keystorestorePassowrd:refers to the password used to access the keystore file itself. It is the password required to open and access the keystore, which holds the private key.keyAlias: alias name that we set while creating the keystore file. In our case it is “test” (check the command above).keyPassword: refers to the password specific to the private key entry within the keystore. It is the password required to use the private key for signing the application. You can use the same password for both thestorePasswordandkeyPasswordin yoursigningConfigsblock. Since the keystore only contains one key entry with the alias "test", using the same password for both purposes simplifies the configuration.
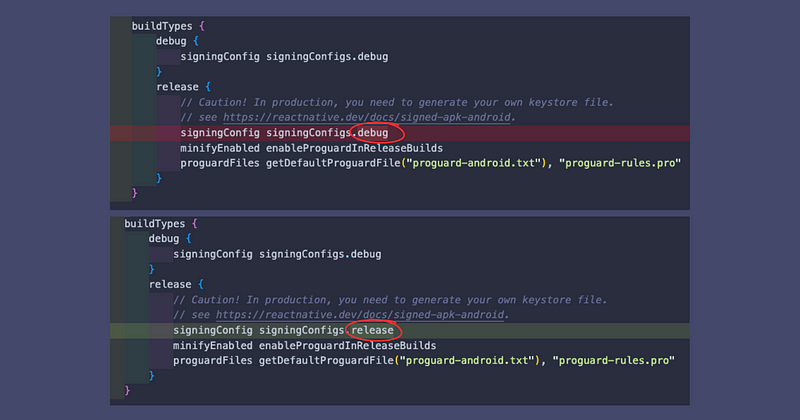
3. Replace the release in the buildTypes with the following
buildTypes {
        debug {
            signingConfig signingConfigs.debug
        }
        release {
            // Caution! In production, you need to generate your own keystore file.
            // see https://reactnative.dev/docs/signed-apk-android.
            signingConfig signingConfigs.release
            minifyEnabled enableProguardInReleaseBuilds
            proguardFiles getDefaultProguardFile("proguard-android.txt"), "proguard-rules.pro"
        }
    }
“signingConfigs.release” refers to the specific signing configuration named “release” defined above in the build script.
The signing configuration contains the necessary information for signing the APK, such as the keystore file, the keystore password, and the key alias. By associating the release build type with the signing configuration, the build system knows which signing information to use when creating the signed APK for the release version of the app.
So basically , the line “signingConfig signingConfigs.release” sets the signing configuration for the release build type, indicating that the release APK should be signed using the signing information specified in the “release” signing configuration. 👇
Minification is a process that reduces the size of the code by removing unnecessary characters, such as whitespace and comments, and by shortening variable and method names. This optimization technique helps to reduce the overall size of the app, making it load and run faster.
Obfuscationis another technique used to protect the code from reverse-engineering. It involves renaming classes, methods, and variables to obscure their original names. This makes it more difficult for someone to understand and analyze the code, providing a level of security to the app’s logic and algorithms.
There are two ProGuard files specified:
"proguard-android.txt": This is a default ProGuard configuration file that comes with the Android SDK. It contains pre-defined rules and settings specifically tailored for Android apps. It ensures that common Android components and libraries are handled correctly during the minification and obfuscation process."proguard-rules.pro": This is a custom ProGuard configuration file that allows you to add your own rules or customisations. You can define specific classes, methods, or resources that should be excluded from minification or specify additional obfuscation rules based on your app's needs. It provides flexibility to customise the minification and obfuscation process according to your app's requirements.
ProGuard itself is a tool that performs code minification and obfuscation. By specifying these ProGuard files in the build configuration, the build system will utilize ProGuard during the build process. ProGuard will apply the default rules from “proguard-android.txt” and any additional rules or customizations defined in “proguard-rules.pro”. This helps optimise the app’s code by reducing its size and making it more difficult to reverse-engineer.
Crate a build using the command in the android folder
 cd android
//In the android folder enter the command to create a build.👇

./graldlew assembleRelease
Log on to your sandbox account and see if Clover Sandbox is accepting the APK or not by uploading the newly created build.
Make sure to have the right targetSdkVersion in the android/build.gradle as per the Clover device you are targeting to make an app.